Now that I had my garden bed and seeds, I am going to give my first cost. I set up my cost in a spreadsheet (the picture will also be included with the other photos, I am uploading to this blog).
In the first section I had the expense. The second section had the cost. After this I added the vegetable savings. I first had the vegetable name, then the total weight and amount, and finally the total cost of each vegetable that I grew. I also added the savings that were left over after each vegetable paid it's amount of the garden cost. With that I added the amount needed per type of vegetable to get a saving. I know this all seems very complicated, but the picture will clear things up.
Anyhow, I had a few things to add to the expense side. First was the participation fee and the space fee. The full cost of these two things are for the area of 3 raised beds. Considering that I am only keeping track of my bed, I divided the cost by 3. The final cost for these fees was $47. $17 for participation, and 30 for space. Also, though the compost was free, the Spagnum peat moss had to be bought. The Spagnum peat moss came to $14. When we were getting this peat moss, my parents did buy many more seed packets, however I didn't use any. The seeds that I did buy came to $15.84.
Finally, the discussion of gas came into the factor. I couldn't walk or bike there, since the road leading to it, is very dangerous. I think I might have come up with a long detour, but I'm not sure. I decided that there would be a cost of gas, so I decided to keep track of how many trips I took. I made a chart. I gave the date, the number of times we went that day, (going there and back would be going 2 times), what we did there, and who went. Next to all of this, I would make a star. If I worked on my bed, then I would put a star counting the trip. If I was just looking and didn't touch anything, or if I worked on beds other than my own, then I wouldn't count it. I found the cost of a one way trip, by first finding the mileage. Our route is two miles long. Our car is a only 18 miles a gallon, which I know is non-environmental. A gallon gas is about $4, so you simplify 2 out of 18 miles to 1 out of 9. Then you find 1/9 of $4 and you find the gas cost. It was a stunning 44 cents there and 44 cents back.
So, in total, not counting car trips, the expenses have come to $76.84.
Already, a home garden would be winning, with no fees, or car trips. However, I still believe that more vegetables will grow in the community garden, so I haven't given up.
Sunday, November 11, 2012

Sunday, October 28, 2012
A Sorry Delay
I feel like I am saying this quite a lot on this blog, but I have never been great at keeping a journal, so this process is new to me. I will make a harder commitment, however. I am sorry for this delay, and after Hurricane Sydney lets out, and I can write without fear of no power, you'll hear more about the garden, and... BALD EAGLE SIGHTINGS!!!!!!!
Wednesday, September 26, 2012
Being Pure Organic
I have to admit that I might have really overdone it a bit with being completely organic, such as the hybrid tomato seeds and such. But I just don't want my garden to be non organic at all.
One of the most controversial subjects about this topic was when we were told that it would be a good idea to put in some soil additives. They are those little round pill things that you sprinkle around your bed. Being the paranoid person I am, I wanted to see if these additives were truly organic. The first pill was phosphate, which my dad says comes from a rock so this was organic. The phosphate is used to put phosphorous, a fertilizer, in the ground. The second additive was sulfur. This too is a mineral so organic and is used to put helpful organisms in the soil since they eat the sulfur. Finally, there was cow urea. This was a problem. Reading The Omnivore's Dilemma I know that conventional cows are treated quite badly and are stuffed full of unhealthy antibiotics. So I was wondering does the urea come from organic cows or conventional cows. I asked one of the starters of the community garden who is a seasoned gardener, and she replied, "Unless the organic farmers followed the cow around the pasture until it gave it's urea I'd say this was conventional." This made me uneasy. My dad reasoned that the antibiotics probably don't come into the cow urea, but I wasn't too sure. We each did our research for quite a bit and we both came to the conclusion, we would pass on the urea. My reason was that cow urine actually does have traces of antibiotics in it. That would make my garden non organic. My dad's reason was partly that, being a vegetarian, he didn't feel comfortable using an animal product. His main reason however was that it seems that even though the urea has lots of nitrates (fertilizer) and balances the pH (acidity and alkalinity) of the dirt, it kills the small organisms that sulfur brings. So, we decided to skip it. I don't know if my garden was affected because of my lack of cooperation for the urea, but I do know that it's a little more organic, because of it.
One of the most controversial subjects about this topic was when we were told that it would be a good idea to put in some soil additives. They are those little round pill things that you sprinkle around your bed. Being the paranoid person I am, I wanted to see if these additives were truly organic. The first pill was phosphate, which my dad says comes from a rock so this was organic. The phosphate is used to put phosphorous, a fertilizer, in the ground. The second additive was sulfur. This too is a mineral so organic and is used to put helpful organisms in the soil since they eat the sulfur. Finally, there was cow urea. This was a problem. Reading The Omnivore's Dilemma I know that conventional cows are treated quite badly and are stuffed full of unhealthy antibiotics. So I was wondering does the urea come from organic cows or conventional cows. I asked one of the starters of the community garden who is a seasoned gardener, and she replied, "Unless the organic farmers followed the cow around the pasture until it gave it's urea I'd say this was conventional." This made me uneasy. My dad reasoned that the antibiotics probably don't come into the cow urea, but I wasn't too sure. We each did our research for quite a bit and we both came to the conclusion, we would pass on the urea. My reason was that cow urine actually does have traces of antibiotics in it. That would make my garden non organic. My dad's reason was partly that, being a vegetarian, he didn't feel comfortable using an animal product. His main reason however was that it seems that even though the urea has lots of nitrates (fertilizer) and balances the pH (acidity and alkalinity) of the dirt, it kills the small organisms that sulfur brings. So, we decided to skip it. I don't know if my garden was affected because of my lack of cooperation for the urea, but I do know that it's a little more organic, because of it.
Monday, September 3, 2012
My Plan
My plan for my garden was a very very hard thing to put together. I never really thought about how different each vegetable was. Vegetables grow at all different times. They like and dislike climates, and take different amounts of time to grow. Some keep producing, while some need to be planted in succession. While I juggled with all these aspects I had to consider how deep each seed should go. Also how high they had to grow. You couldn't have a plant block sunlight from another. Also how many plants for each square foot and some spread, so the book had an idea about vertical gardening. It's where you take a vine plant like a pumpkin or a cucumber and trail it to climb up something like a vertical net. That way it doesn't take up so much room. (We wanted to do this but we didn't really complete it for all the vegetables. We did get a cucumber to crawl up this catchers net we erected. Instead we let the other vine plants trail out into our plant walking aisle. This turned out fine except now it is barely possible to walk in some of our aisles at all.)
Anyway back to my plan. At this time you know I was in trouble. Every time I thought I understood this a new problem or exception would come up. How in the world would I graph this? My dad had an idea. He made a calender from March to October in weekly intervals. After that I caught on to the idea. I put my 16 vegetables vertically while my dad's calendar weeks were horizontally. I started with looking at my seed packets where they said how long it took and roughly divided by 7. Then I put how long it took to germinate. (I thought it was one week. Big mistake as I'm going to find out.) Then I put the indoor starting time. Of course some can't be indoors like radishes, so they were just put in the ground at the appropriate time. I followed this with putting all plants outside in the ground, and how long till harvest. Some had to be replanted while others kept creating vegetables. Then it was brought to my attention the fact that the vegetables liked and disliked certain seasons. So after finding the seasons I created dead seasons, when the plant wouldn't be growing. All of this was based off the idea that April 23rd was the end of frost and October 10th was the start of frost. I then color coded and made a key for the calender. I then made a separate spreadsheet about the seed depth, width from other seeds, and the height of the plant. I used this to help plan out my bed. When I first drew it up, I had just tried to make it symmetrical. Once again my dad said I had forgotten something; height. The small plants should be up front, and the big ones behind, so they would all get equal sunlight. Plus the vine plants should be near the edge. I then rewrote it. I realized how much space I had in the bed. (In real life with the plants growing everywhere the space gets cramped.) Anyhow I color coded, labeled, and keyed the bed. In the key there was the abbreviation of the vegetable I was using, how many plants per square feet, how many seeds I needed and how many I needed indoors.
This plan was made using confusing research, modern technology (is Spreadsheet modern), and, yes, a few arguments (how about discussions?), among other painstaking things. But at the end I think I have a clue what to do.
I don't have good pictures of the climbing cucumber plants, the clogged aisles, and my plan, but I will upload it shortly.
Anyway back to my plan. At this time you know I was in trouble. Every time I thought I understood this a new problem or exception would come up. How in the world would I graph this? My dad had an idea. He made a calender from March to October in weekly intervals. After that I caught on to the idea. I put my 16 vegetables vertically while my dad's calendar weeks were horizontally. I started with looking at my seed packets where they said how long it took and roughly divided by 7. Then I put how long it took to germinate. (I thought it was one week. Big mistake as I'm going to find out.) Then I put the indoor starting time. Of course some can't be indoors like radishes, so they were just put in the ground at the appropriate time. I followed this with putting all plants outside in the ground, and how long till harvest. Some had to be replanted while others kept creating vegetables. Then it was brought to my attention the fact that the vegetables liked and disliked certain seasons. So after finding the seasons I created dead seasons, when the plant wouldn't be growing. All of this was based off the idea that April 23rd was the end of frost and October 10th was the start of frost. I then color coded and made a key for the calender. I then made a separate spreadsheet about the seed depth, width from other seeds, and the height of the plant. I used this to help plan out my bed. When I first drew it up, I had just tried to make it symmetrical. Once again my dad said I had forgotten something; height. The small plants should be up front, and the big ones behind, so they would all get equal sunlight. Plus the vine plants should be near the edge. I then rewrote it. I realized how much space I had in the bed. (In real life with the plants growing everywhere the space gets cramped.) Anyhow I color coded, labeled, and keyed the bed. In the key there was the abbreviation of the vegetable I was using, how many plants per square feet, how many seeds I needed and how many I needed indoors.
This plan was made using confusing research, modern technology (is Spreadsheet modern), and, yes, a few arguments (how about discussions?), among other painstaking things. But at the end I think I have a clue what to do.
I don't have good pictures of the climbing cucumber plants, the clogged aisles, and my plan, but I will upload it shortly.
Saturday, September 1, 2012
Coming Up
My school year is about to start so I might not be able to do posts for a couple days. But after that be ready to learn about my garden plan.
The Blomer signing out.
The Blomer signing out.
Monday, August 27, 2012
Making the Raised Beds
Now everyone needed raised beds. Well not everyone. I believe 1 or 2 families just wanted row gardening.

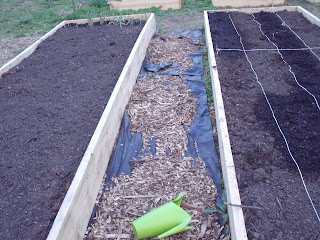 Here is our walkway half finished next to two of our beds. The string you see on the right was the beginning of my square foot plotting. I already planted in this picture.
 Here is part of the community garden with the beds filled.
The majority of people were going to have wooden boards connected in a rectangle. It would be like a box with no top or bottom. I was at the Pennsylvania Association of Environmental Educators with a few classmates but my dad was there. His back was sore for a whole day. He said they had to construct the boxes, carry it down a hill and place it in the spot. And there were 180 of them, 3 for every plot. Each box was 16 feet by 4 feet. That's 64 sq. ft a box. The height was probably a half foot maybe more. Then we had to fill the 3 boxes with dirt. But even before that we had to pull out the weeds. I had chosen the middle bed with a medium amount of weeds. My mom's bed was really weedy so we covered the bottom in a tarp thing. I believe it was bio degradable but I'm not sure. It might not have been. My dad and I didn't have as many weeds so we opted out on this tarp material. Our community garden is right next to the place where all the leaf compost goes, so there are mounds and huge hills full of compost. We used that to fill our beds, about 12 wheelbarrows per bed. This was hard because the mounds were on the other side from our beds, and up a hill. Unlike other plots we filled our boxes almost to the brim. Then we realized that you can make the bed better for a plant by mixing in peat moss and such sandy fluffy material so that the soil isn't so hard for a plant's roots to breach through. It was about 2 bags to cover 1 box. We had to go to the garden twice that day to fill all the beds. In between the 3 beds there were walkways, which we covered with remaining tarp and wood chips. So by the end of the day there were three filled beds with two walkways, and a thin perimeter which made up our plot.

Here is what a bed of ours looked like.
 Here is our walkway half finished next to two of our beds. The string you see on the right was the beginning of my square foot plotting. I already planted in this picture.
 Here is part of the community garden with the beds filled.
Wednesday, August 22, 2012
The Experienced Dad
You might have seen from these past few blogs that my dad has a pretty good idea of what he's talking about with the garden. The reason for that is that when he was a child he lived on the property with the pond. If you remember I said it was rural so one summer I belive he went and worked with the farmer there in exchange for some vegetables to take home. That is how he became so experienced. He still calls himself an amateur which is true when you see some of the other gardeners beds at the community garden. But we're both learning fast
Subscribe to:
Posts (Atom)